Wondering how to clean install Windows 11? A clean OS installation may be required to solve software issues, remove bloatware, or tackle a virus/malware attack. Basically, it denotes a fresh installation of an operating system on your PC. You can perform a clean installation using the setup CD that came with the product key when you bought your OS copy. Or, you can use a bootable USB Flash Drive or DVD for Windows 11 installation. Sounds confusing? Don’t worry. We will be elaborating on the entire process in a moment. Keep reading this article.
What are the requirements for a clean install of Windows 11?
As mentioned before, you will need a bootable USB Flash Drive or a DVD containing Windows 11. If you are installing Windows 11 on your PC for the first time, you will also need a product key to activate. You can use a Windows 7, 8, or 10 product key to activate Windows 11. However, if you had already activated Windows 11 on your PC before and the clean installation is just a reinstallation, you will not require a product key. Let’s go over the requirements through pointers for better understanding. You will need:
1) A bootable USB Flash Drive or DVD containing Windows 11 installation media.
2) A product key, if you are installing Windows 11 on the target PC for the first time.
Clean Install Windows 11 using a bootable drive
As you may already know, you will need to create a bootable drive with the required installation media for Windows 11. We have created a detailed guide on how to create one – we recommend you check that out if you don’t have a bootable drive already. Once you have the bootable drive and the product key (if needed) ready, we can start the process. Follow these steps to clean install:
1) You will need to boot from the USB Flash Drive.
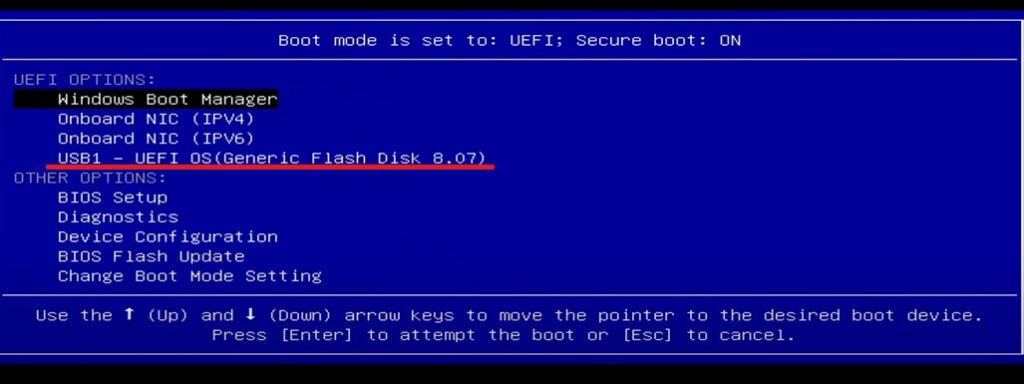
– Switch on your PC and press the key for boot options (according to your PC’s manufacturer). It can be F2, F10, F11, or any key. You can also look for this information on your PC manufacturer’s website.
– If you are able to power on your PC, you can also enter the BIOS settings through Windows Settings. To open BIOS through Windows Settings, go to Settings > System > Recovery > Advanced startup > Restart Now. From the “Choose an Option” screen, navigate to Troubleshoot > Advanced Options > UEFI Firmware Settings and then click “Restart”. You will then see the BIOS settings screen.
– In the BIOS settings, you will see an option to boot through USB under the UEFI Options. Select it and press Enter. This will open up Windows Setup.
2) Complete the Windows Setup to trigger installation.
In the Windows Setup window, you will be asked to choose the language, time, and keyboard format – choose according to your needs and click on Next. In the following window, click on Install now. For a fresh installation, choose Custom: Install Windows only (recommended). Now, choose the drive where you want to install Windows and click on Next. That’s it. Windows 11 will now clean install on your PC.
Once the installation is done, Windows will guide you through the setup. Follow the on-screen instructions and you will be able to use your PC in no time. For more articles on Windows 11, stay tuned to us!


