Well, after the recent reports from players facing NAT issues with COD Vanguard, we have come up with some fixes and workarounds that might be fixing the NAT type issue for you. So, in this article, we will be sharing all the details regarding how to set your NAT type to Open in COD Vanguard. Here’s everything you need to know.
Developed by Sledgehammer Games and published by Activision, COD Vanguard is currently receiving a ton of love from the COD fans all over the world. The main reason why many players have been playing this game is the fact that it is free-to-play. Yes, you can just download the game and play it even if you don’t own the base game. That’s great, right? Well, Vanguard does have its fair share of bugs and errors. Anyways, recently players are facing issues with the NAT type thereby restricting them from playing the game seamlessly. Since it is an online game, having a good NAT is very important. So, if you are facing such issues, don’t worry anymore as this guide will help you get rid of them. Continue reading for more information.
How to fix NAT Type to Open in Call of Duty Vanguard on PC, Xbox Series X/S, PS5, PS4 & Xbox One
So, to set your NAT type to Open in COD, you will need to Port Forward. This is because it will make the network connection more stable and fast ensuring better connectivity.
Well, you will need the following details before proceeding :
1) IP Address of your Router
2) Your PC/Console’s machine IP
3) TCP and UDP ports to forward
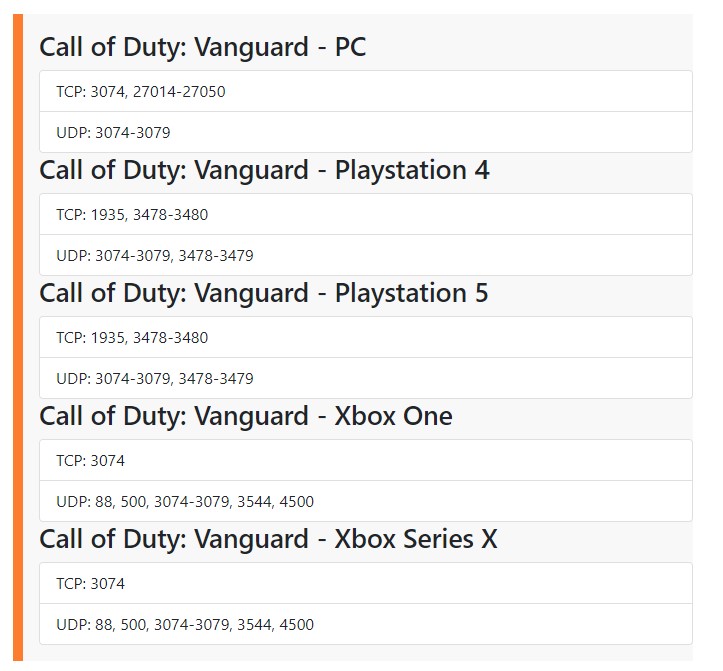
The ports are featured in the image given below:
So, we will be sharing details on how to undergo the Port Forwarding process from your PC. So, first, you will need to find out the default gateway on your PC. To do so,
1) Press Win+R and then type cmd.
2) The Command Prompt will open. type ipconfig and hit enter to get more details. Now, a list of settings related to your connection will appear.
3) Find the Default Gateway option and copy the address right next to it.
4) Now, paste the address on your Browser’s search bar and hit Enter.
5) The Gateway login will appear. So, now you will need to enter the username and password of your admin tool which basically depends on the router you are using. You can check this list to find more details about it.
6) After you have signed in, you will have to find the Advanced Tab. This is going to be different for every router, so make sure to explore the options.
7) Now, the Port Forwarding option will be located under the Advanced Tab.
8) Click on it and now you will have the option to add ports. Simply select the ports from the above image and add them to the Port Forward menu. You can add the corresponding ports for your console as well.
After you are done, the port will be added and the NAT type should be fixed for now. If you are still in doubt, you can watch this video by ChrisThatGamer to get better clarity.
Well, this was our guide on how to fix the NAT type in COD Vanguard for PC, Xbox Series X/S, PS5, PS4 & Xbox One. For more such guides and information on new games, make sure to stay tuned with us on AndroidGram.


